How to Deploy a Django (Python) App on Namecheap — Step by Step (with Git Commands)
By Kaushal Patel8 min read
Namecheap’s shared hosting isn’t only for WordPress and PHP — its cPanel includes Setup Python App, which runs Python web apps through Passenger. That makes it an affordable home for a Django project, as long as you set it up the right way.
In this guide we’ll take a Django project from your laptop to a live, HTTPS-secured site on Namecheap, using Git and SSH to deploy — and finish with a one-command script for every future update.
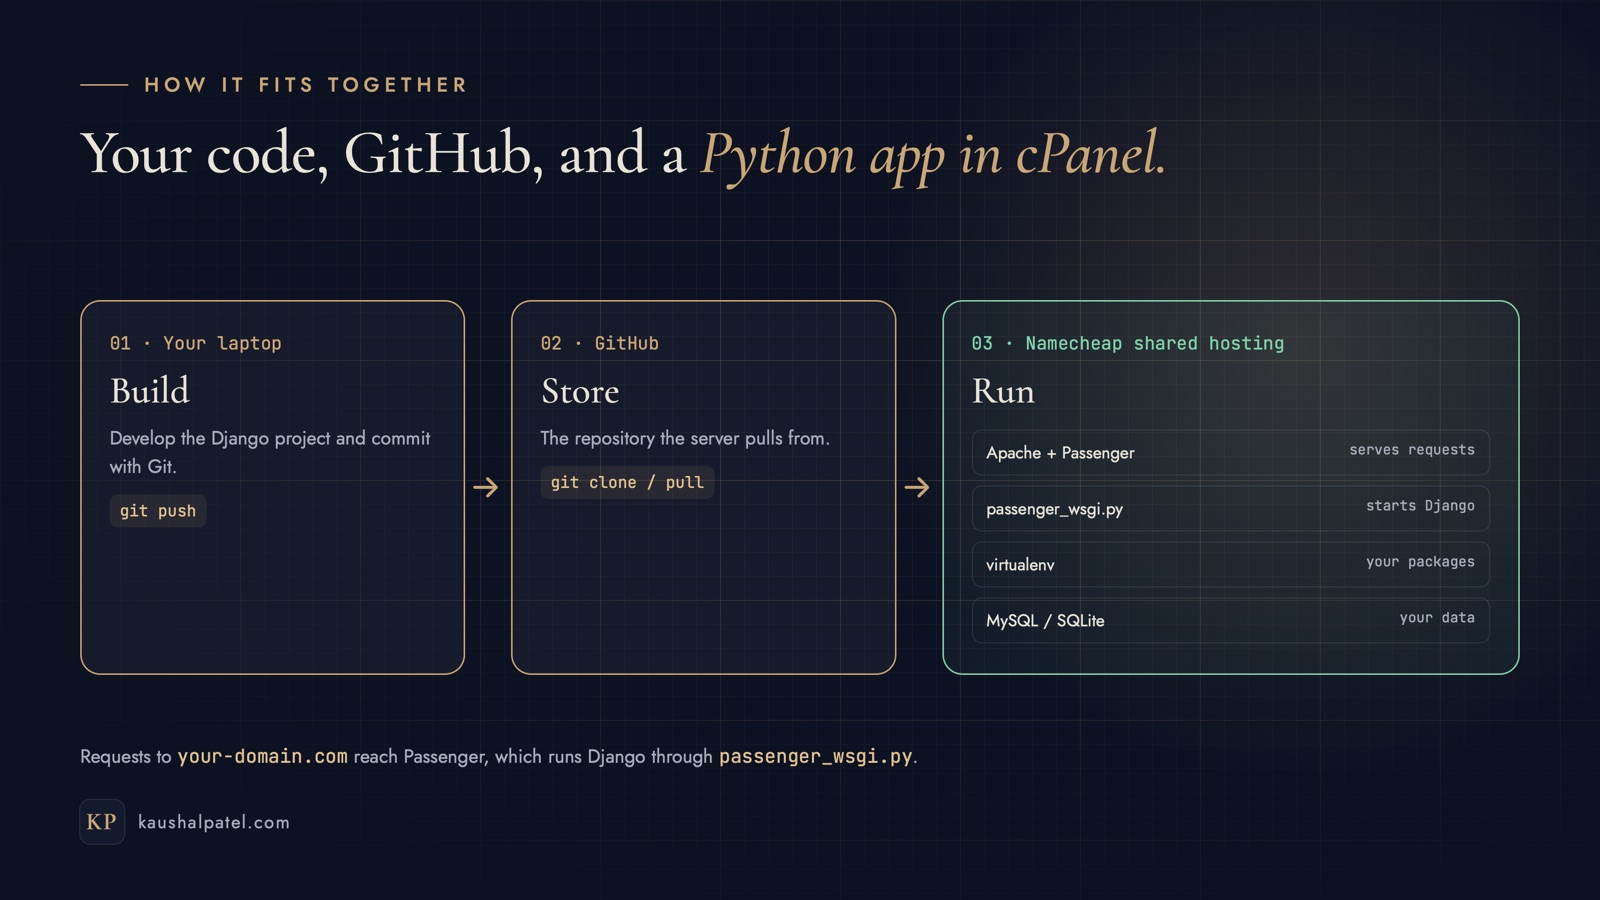
How the pieces fit: you push to GitHub, the server pulls, and Passenger runs Django.
What you’ll need
A Namecheap shared hosting plan with cPanel, and a domain pointed at it.
SSH access to your hosting (Namecheap uses port 21098). cPanel’s built-in Terminal works too, if your plan has it.
Python 3 and Git on your computer, and a GitHub account.
Step 1 — Create the Django project locally
Create a folder, a virtual environment and the project:
That gives you manage.py and a mysite/ settings package in the current folder. WhiteNoise will serve your CSS and JavaScript in production, and python-dotenv loads secrets from a .env file.
Step 2 — Make the settings production-ready
Open mysite/settings.py and replace the hard-coded secret key, debug flag and allowed hosts so they come from the environment:
import os
from pathlib import Path

from dotenv import load_dotenv

BASE_DIR = Path(__file__).resolve().parent.parent
load_dotenv(BASE_DIR / ".env")  # reads the .env file if it exists

SECRET_KEY = os.environ.get("DJANGO_SECRET_KEY", "dev-only-insecure-key")
DEBUG = os.environ.get("DJANGO_DEBUG", "False") == "True"
ALLOWED_HOSTS = os.environ.get("DJANGO_ALLOWED_HOSTS", "localhost,127.0.0.1").split(",")
CSRF_TRUSTED_ORIGINS = [f"https://{h}" for h in ALLOWED_HOSTS if h not in ("localhost", "127.0.0.1")]
Add WhiteNoise right after Django’s security middleware, and tell Django where to collect static files:
MIDDLEWARE = [
    "django.middleware.security.SecurityMiddleware",
    "whitenoise.middleware.WhiteNoiseMiddleware",  # ← add this line
    # …the rest stay as they are
]

STATIC_URL = "static/"
STATIC_ROOT = BASE_DIR / "staticfiles"

STORAGES = {
    "default": {"BACKEND": "django.core.files.storage.FileSystemStorage"},
    "staticfiles": {"BACKEND": "whitenoise.storage.CompressedManifestStaticFilesStorage"},
}
For local development, create a .env file next to manage.py:
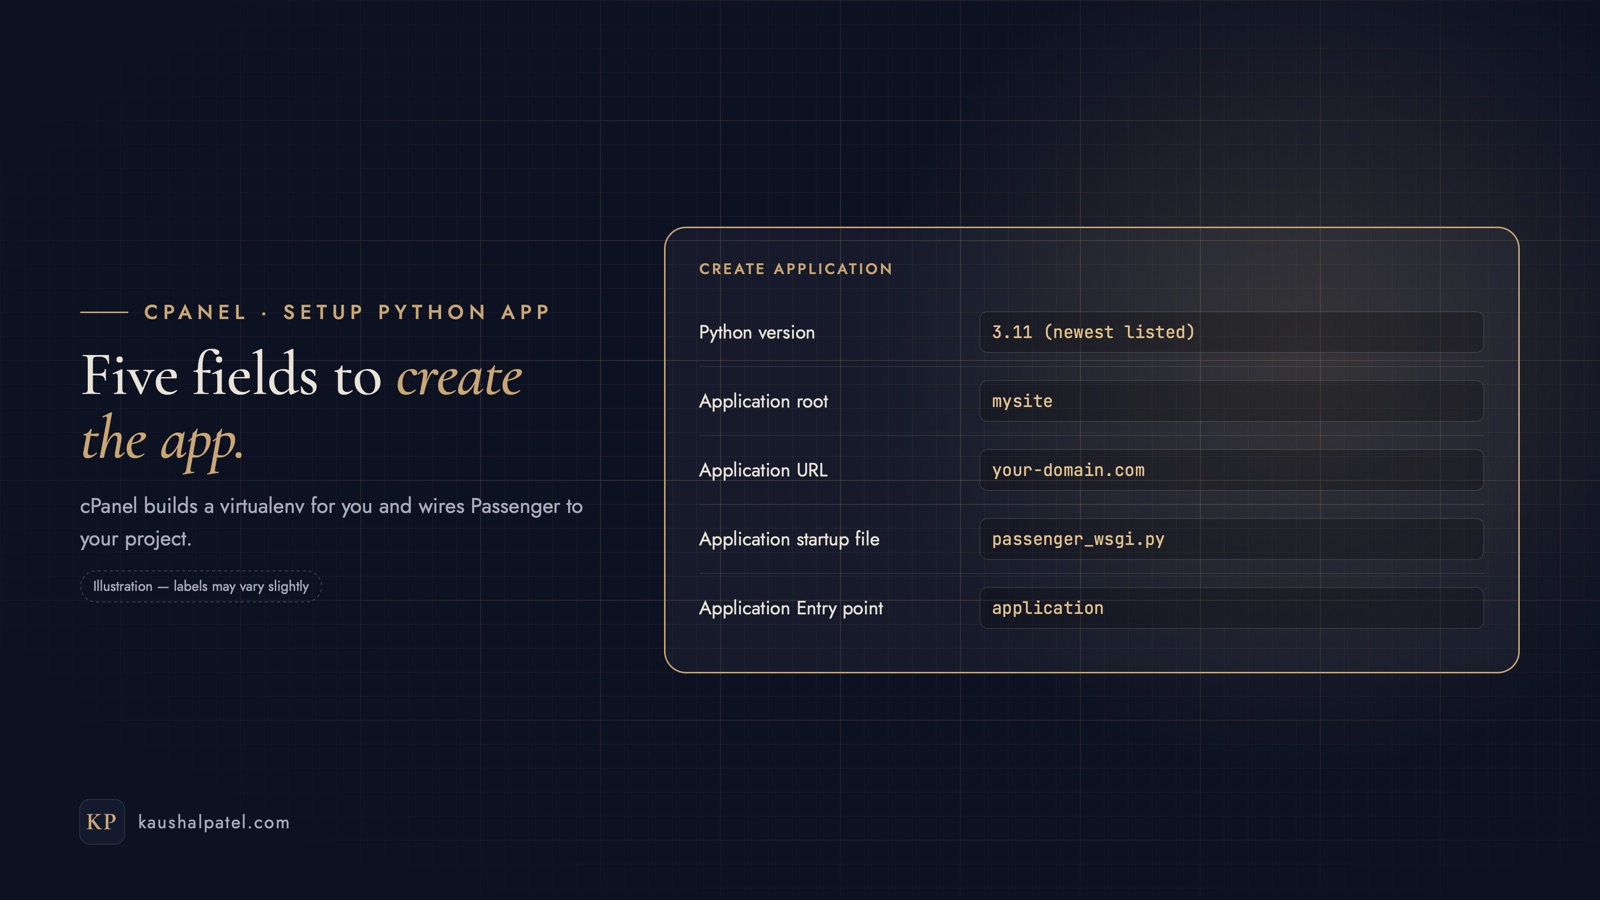
Log in to cPanel, open Setup Python App and click Create Application. Fill in:
Field
Value
Python version
The version you chose, e.g. 3.11
Application root
mysite (a folder in your home directory)
Application URL
Your domain
Application startup file
passenger_wsgi.py
Application Entry point
application
The five fields to fill in (an illustration — wording in your cPanel may differ slightly).
Click Create. cPanel builds a virtual environment for the app and shows a command at the top of the page to enter it — something like source /home/USER/virtualenv/mysite/3.11/bin/activate && cd /home/USER/mysite. Copy it; you’ll use it a lot.
Step 6 — Get your code onto the server with Git
Connect over SSH (find your server name and username in Namecheap’s hosting panel or cPanel):
ssh -p 21098 cpanelusername@your-domain.com
Your repository is private, so give the server its own read-only deploy key:
Copy the printed key into GitHub: your repository → Settings → Deploy keys → Add deploy key (leave write access off). Then tell SSH to use it for GitHub by adding this to ~/.ssh/config on the server:
Host github.com
  HostName github.com
  User git
  IdentityFile ~/.ssh/github_deploy
  IdentitiesOnly yes
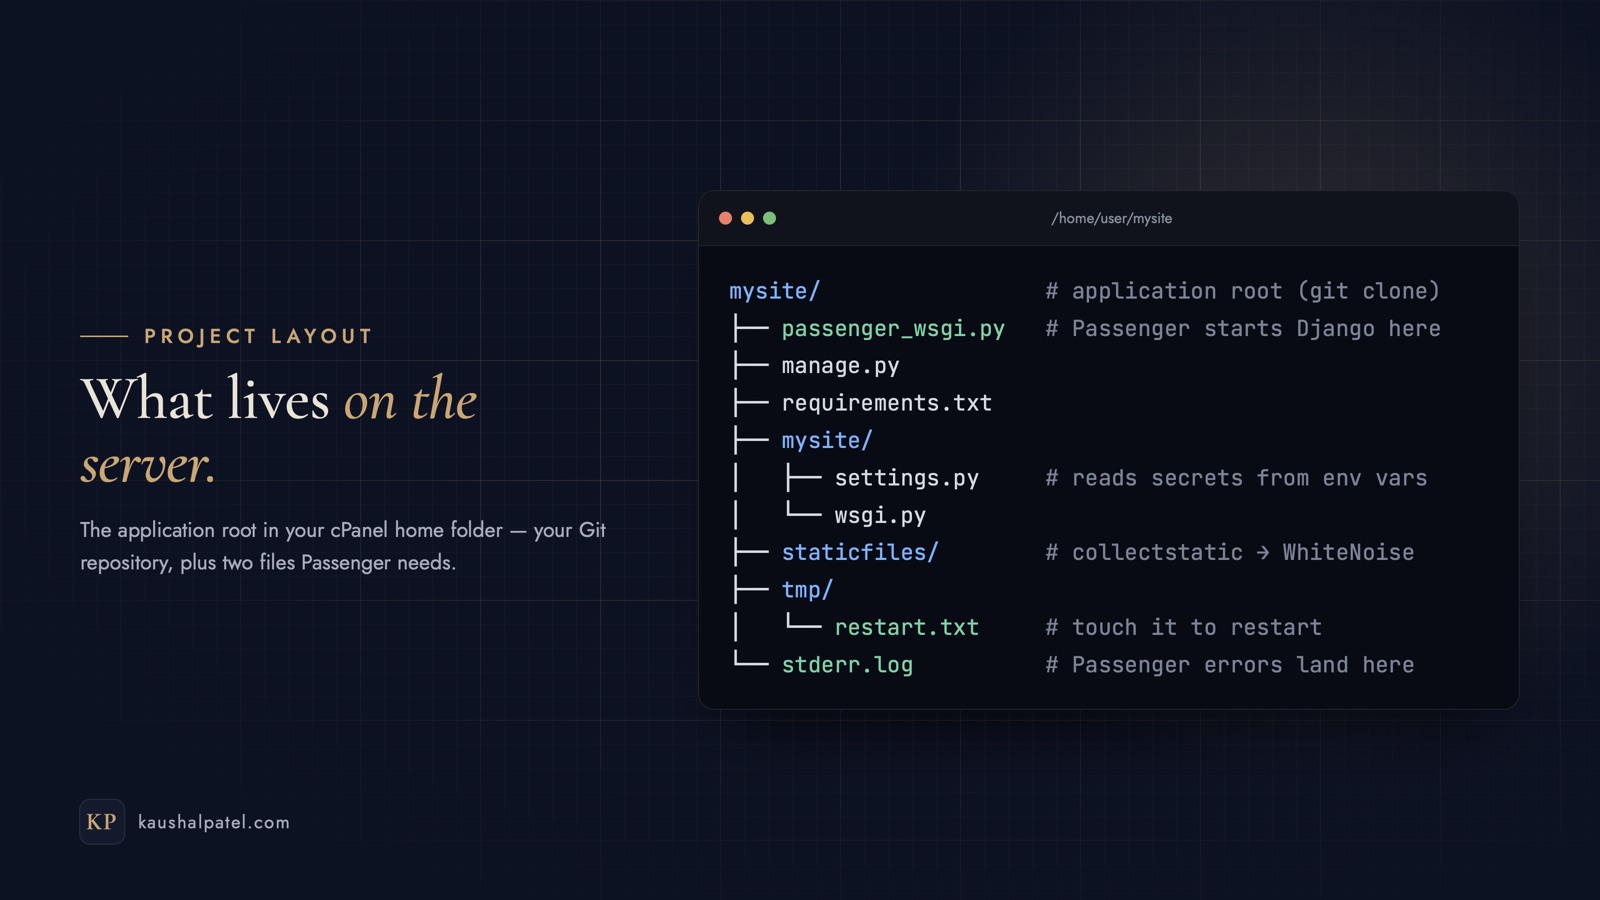
The app folder cPanel created already contains a few files, so instead of cloning into it, turn it into a repository and check out your code:
Lock it down so only your account can read it: chmod 600 .env. Because settings.py loads this file itself, the same secrets work for the live site and for the commands you run over SSH.
Step 8 (optional) — Use a MySQL database
SQLite works out of the box and is fine for small sites. For MySQL, open MySQL Databases in cPanel, create a database and a user, and add the user to the database with All Privileges. The usual mysqlclient driver often can’t be compiled on shared hosting, so use the pure-Python PyMySQL instead:
Add DB_NAME, DB_USER and DB_PASSWORD to the server’s .env. Django 5.2 needs MariaDB 10.5+ or MySQL 8.0.11+ — phpMyAdmin in cPanel shows which version your server runs.
Step 9 — Migrate, collect static files and go live
Still inside the virtual environment on the server:
check --deploy lists security settings worth reviewing, and touching tmp/restart.txt tells Passenger to restart your app (the Restart button in Setup Python App does the same). Visit your domain — Django is live, and /admin/ is ready for the superuser you just created.
Step 10 — Turn on HTTPS
In cPanel, open SSL/TLS Status (or the Namecheap SSL tool on your plan) and make sure your domain has a certificate installed. Once https:// works, add these lines to the end of settings.py so Django always uses secure connections and cookies in production:
if not DEBUG:
    SECURE_SSL_REDIRECT = True
    SESSION_COOKIE_SECURE = True
    CSRF_COOKIE_SECURE = True
Step 11 — Ship updates with one command
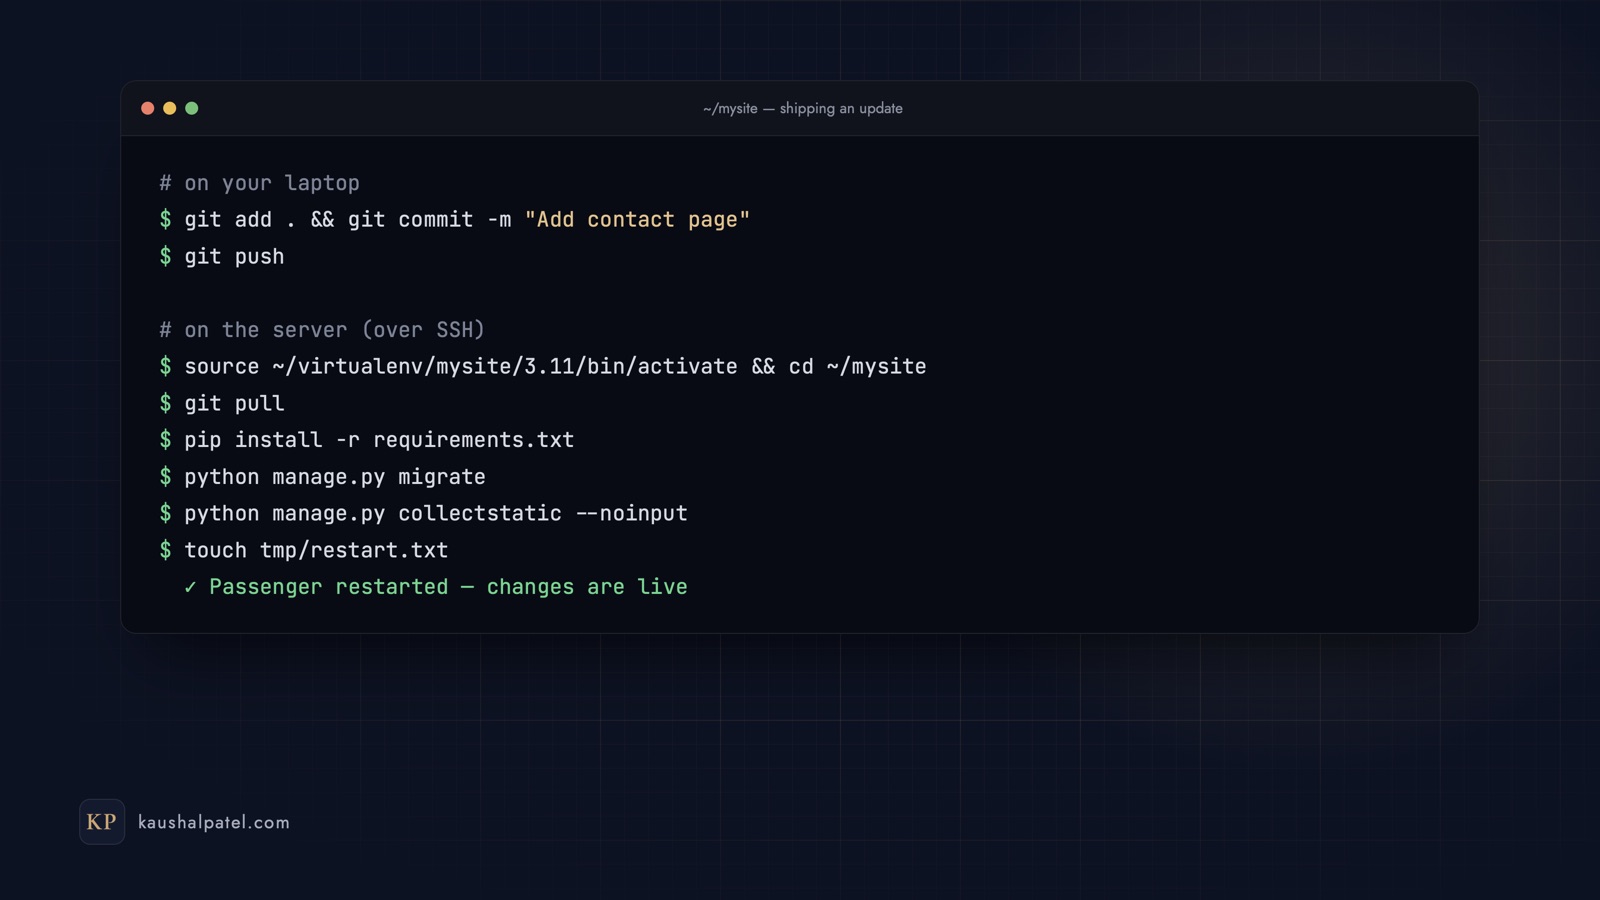
From now on, the workflow is: commit and push on your laptop, then pull and restart on the server.
Every update: push from your laptop, then pull, migrate, collect and restart on the server.
Save the server half as deploy.sh in your project (replace USER and the Python version with yours):
“Incomplete response received from application” or a 500 error. Read the real error in Passenger’s log: tail -n 50 ~/mysite/stderr.log.
DisallowedHost. Add the exact domain (with and without www) to DJANGO_ALLOWED_HOSTS in .env, then restart.
The site has no styling. Run collectstatic and check WhiteNoise is directly below SecurityMiddleware.
No module named 'django'. Packages were installed outside the app’s virtual environment — run the source …/activate command first, then pip install -r requirements.txt again.
mysqlclient fails to install. Use PyMySQL as shown in Step 8.
Your changes don’t appear. Restart the app: touch tmp/restart.txt.
git pull asks for a password. The remote is using HTTPS — switch it to the deploy key with git remote set-url origin git@github.com:your-username/mysite.git.
Your launch checklist
Secrets live in .env, which is in .gitignore and chmod 600 on the server
DJANGO_DEBUG=False and DJANGO_ALLOWED_HOSTS set for production
passenger_wsgi.py committed, and the app created in Setup Python App
Code deployed with Git using a read-only deploy key
migrate, collectstatic and check --deploy run on the server
HTTPS working, with secure redirects and cookies turned on
deploy.sh ready for the next update
That’s a complete, repeatable Django deployment on Namecheap — Git for your code, a virtualenv for your packages and Passenger to run it all. Prefer a fully managed platform for a JavaScript project instead? Read my guide to deploying a Next.js app on Vercel. And if you get stuck, send me a message.
Run a Next.js front end and a Node.js Express API on one Ubuntu server: Git, deploy keys, PM2, Nginx routing, free HTTPS with Certbot and a one-command deploy script.
Build a Django REST Framework API and a React front end that uses it: models, serializers, ViewSets, CORS, Vite, fetch, Git and a path to production — every command included.
From create-next-app to a live custom domain: push your Next.js project to GitHub, deploy it on Vercel, add environment variables, preview branches and roll back safely.